Practical Arduino Robotics: A Hands-On Engineering Guide to Building Real Robots with Arduino
Introduction 🤖🚀
Robotics is one of the fastest-growing fields in modern engineering. From autonomous warehouse vehicles to medical assistants and planetary exploration rovers, robots are transforming industries across the world. Fortunately, building robots is no longer limited to research laboratories or large companies. Thanks to Arduino, anyone—from beginners to experienced engineers—can design, program, and build intelligent robotic systems.
Arduino provides an affordable and flexible hardware platform that combines electronics, programming, mechanics, and automation into a single learning experience. Whether your goal is to create a simple line-following robot or a sophisticated autonomous vehicle equipped with artificial intelligence, Arduino serves as an excellent starting point.
This practical engineering guide explores every essential concept needed to design and build real Arduino robots. Along the way, you’ll learn about sensors, actuators, control algorithms, power systems, communication methods, and engineering best practices.
✨ By the end of this article, you’ll understand how professional robotic systems are built while gaining practical knowledge you can immediately apply to your own projects.


Background Theory ⚙️
Robotics combines several engineering disciplines into one integrated system.
The four major engineering branches involved include:
- ⚡ Electrical Engineering
- 💻 Computer Engineering
- ⚙️ Mechanical Engineering
- 🤖 Control Engineering
Every robot follows a simple engineering cycle:
Sense → Process → Decide → Act
The robot continuously gathers information from its environment using sensors. The Arduino processes this information, decides what action should be taken, and sends commands to motors or actuators.
This feedback process continues hundreds or even thousands of times every second.
Definition 📚
Arduino Robotics is the design and construction of robotic systems using Arduino microcontrollers to control sensors, motors, communication devices, and intelligent algorithms.
An Arduino robot typically includes:
- Arduino controller
- Sensors
- Motor drivers
- Electric motors
- Chassis
- Battery
- Software
Together, these components enable the robot to interact with its surroundings autonomously or through remote control.
Step-by-Step Guide to Building Your First Arduino Robot 🛠️


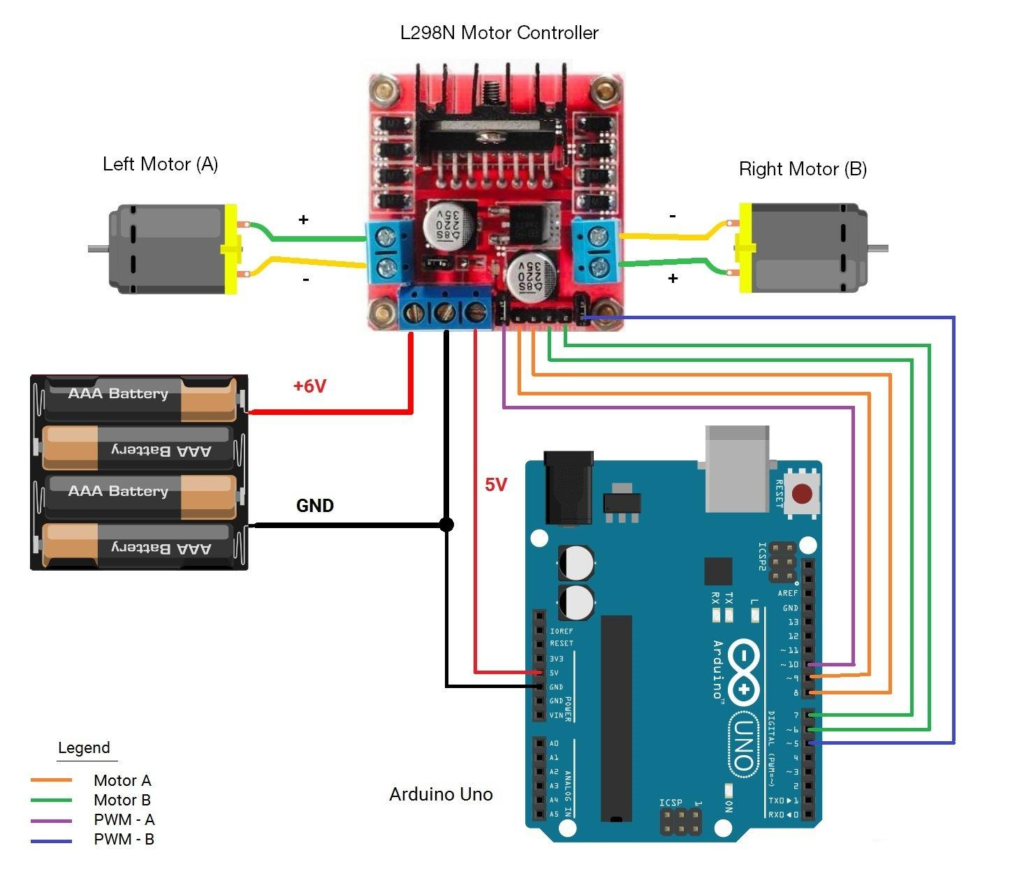


Step 1 — Select the Arduino Board
Popular choices include:
| Board | Best For |
|---|---|
| Arduino Uno | Beginners |
| Arduino Nano | Small robots |
| Arduino Mega | Advanced robotics |
| Arduino Due | High-speed processing |
Step 2 — Build the Robot Chassis
A basic robot requires:
- Metal or acrylic frame
- Two DC motors
- Wheels
- Caster wheel
- Battery holder
A strong chassis improves stability and movement accuracy.
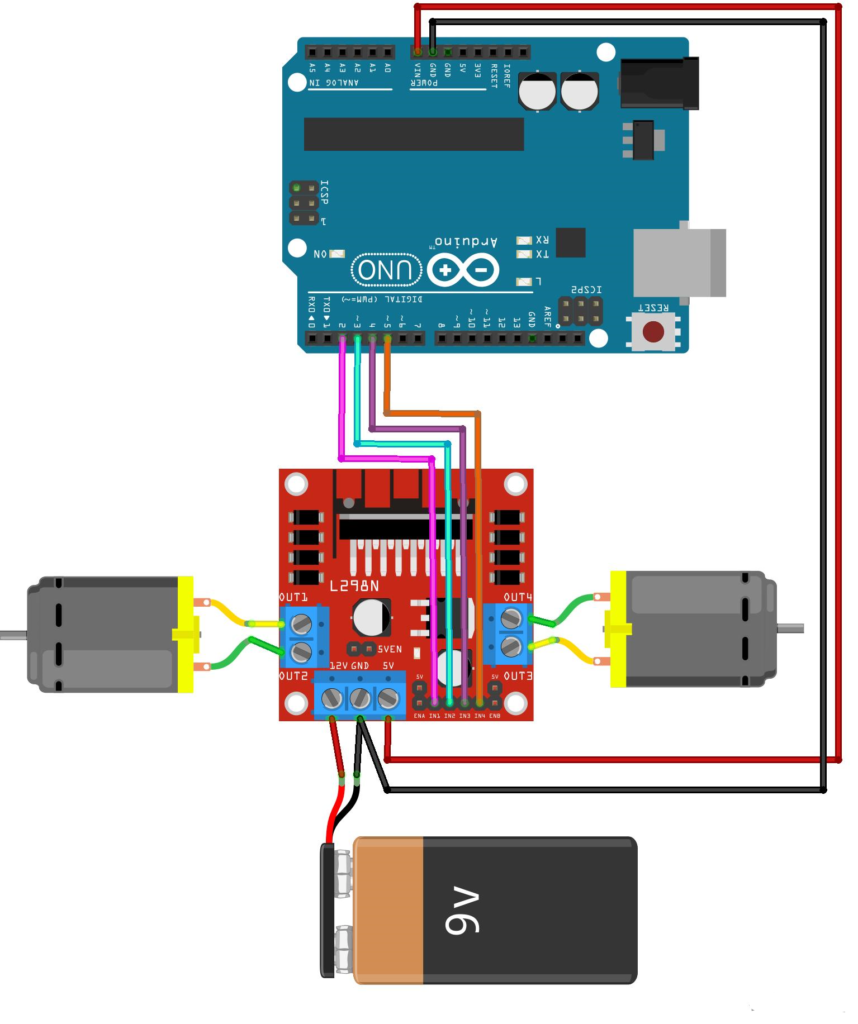
Step 3 — Install the Motor Driver
Arduino cannot directly power motors.
Popular motor drivers:
- L298N
- L293D
- TB6612FNG
The motor driver receives signals from Arduino while supplying adequate current to the motors.
Step 4 — Connect Sensors
Typical beginner sensors include:
📏 Ultrasonic Sensor
Measures obstacle distance.
🌡 Temperature Sensor
Monitors environmental conditions.
💡 Light Sensor
Detects brightness.
⚫ Infrared Sensor
Used for line-following robots.
🧭 Gyroscope
Measures orientation.
Step 5 — Connect the Power Supply
Most robots use:
- 18650 Lithium batteries
- LiPo battery packs
- AA rechargeable batteries
Always separate motor power from Arduino logic power whenever possible.
Step 6 — Program the Robot
Arduino programs are written in C/C++ using the Arduino IDE.
Typical program flow:
- Initialize sensors
- Read sensor values
- Make decisions
- Control motors
- Repeat continuously
Step 7 — Test and Improve
Engineers rarely succeed on the first attempt.
Testing involves:
- Motor calibration
- Sensor alignment
- Battery monitoring
- Software debugging
- Mechanical adjustments
Continuous improvement is part of every robotics project.
Comparison 📊
| Feature | Arduino | Raspberry Pi | ESP32 |
|---|---|---|---|
| Ease of Use | ⭐⭐⭐⭐⭐ | ⭐⭐⭐ | ⭐⭐⭐⭐ |
| Cost | Low | Medium | Low |
| Real-Time Control | Excellent | Moderate | Excellent |
| AI Capability | Limited | Excellent | Good |
| Power Consumption | Very Low | High | Low |
| Beginner Friendly | Excellent | Moderate | Very Good |
Robot Architecture and Components 🧩


Basic Robotic System
| Component | Function |
|---|---|
| Arduino | Brain |
| Sensor | Collects information |
| Motor Driver | Controls motors |
| Motors | Movement |
| Battery | Power |
| Chassis | Mechanical structure |
| Software | Decision making |
Sensor Types
| Sensor | Application |
|---|---|
| Ultrasonic | Obstacle detection |
| IR | Line following |
| Camera | Vision |
| GPS | Navigation |
| IMU | Balance |
| Compass | Direction |
Motor Types
| Motor | Usage |
|---|---|
| DC Motor | Wheeled robots |
| Servo | Robot arms |
| Stepper | Precision movement |
| Brushless Motor | Drones |
Examples 💡
Obstacle Avoidance Robot
Uses:
- Ultrasonic sensor
- L298N
- Two DC motors
The robot detects obstacles and changes direction automatically.
Line Following Robot
Uses infrared sensors to detect a black line and continuously adjusts motor speed.
Applications include warehouse automation.
Robotic Arm
Servo motors rotate joints according to programmed angles.
Applications include manufacturing and education.
Bluetooth-Controlled Robot
Controlled through a smartphone application.
Ideal for beginners learning wireless communication.
Wi-Fi Robot
Can be controlled remotely over the internet.
Useful in IoT applications.
Real-World Applications 🌍
Arduino robotics powers many practical engineering solutions.
Manufacturing 🏭
- Assembly automation
- Pick-and-place robots
- Conveyor systems
Agriculture 🚜
- Smart irrigation
- Crop monitoring
- Autonomous vehicles
Healthcare 🏥
- Rehabilitation robots
- Medical assistants
- Automated medicine delivery
Education 🎓
Students learn:
- Programming
- Electronics
- Engineering design
- Automation
Smart Homes 🏠
Robots can:
- Patrol rooms
- Monitor security
- Deliver small items
- Control appliances
Space Exploration 🚀
Robotic systems inspect dangerous environments where humans cannot safely operate.
Common Mistakes ❌
Many beginners encounter similar issues.
Weak Power Supply
Motors reset the Arduino due to voltage drops.
Solution: Use separate power sources.
Poor Wiring
Loose connections cause unpredictable behavior.
Solution: Verify every connection before testing.
Ignoring Weight Distribution
Uneven weight causes unstable movement.
Solution: Place batteries near the center.
No Sensor Calibration
Raw sensor values are often inaccurate.
Solution: Calibrate before deployment.
Overcomplicated Programming
Large codebases become difficult to debug.
Solution: Build modular programs.
Challenges and Solutions 🛡️
| Challenge | Solution |
|---|---|
| Motor vibration | PWM speed control |
| Sensor noise | Digital filtering |
| Battery drain | Efficient programming |
| Wheel slipping | Better tires |
| Communication delay | Optimized protocols |
| Mechanical instability | Reinforced chassis |
Case Study 📈
Autonomous Obstacle Avoidance Robot
A university engineering team developed a low-cost autonomous robot using Arduino Uno.
Hardware
- Arduino Uno
- Ultrasonic sensor
- L298N motor driver
- Two geared DC motors
- 7.4V LiPo battery
Engineering Process
- Designed the chassis
- Installed motors
- Connected electronics
- Developed software
- Performed repeated testing
Results
✅ Reliable obstacle detection
🚀 Stable movement
✅ Battery life exceeded three hours
✅ Successfully navigated indoor environments
The project demonstrated that affordable components can produce dependable robotic systems suitable for education and prototyping.
Essential Tips ⭐
- 🔧 Start with simple robots before advanced projects.
- 📖 Read component datasheets carefully.
- 🔋 Monitor battery voltage regularly.
- 💻 Comment your code for easier maintenance.
- 📏 Keep wiring organized.
- 🧪 Test one subsystem at a time.
- 📊 Record experimental results.
- 🔄 Improve designs through iterative testing.
- 🛡️ Protect circuits against reverse polarity.
- 🚀 Focus on reliability before adding new features.
Frequently Asked Questions ❓
What programming language does Arduino use?
Arduino primarily uses C/C++ with simplified libraries that make embedded programming easier.
Is Arduino suitable for beginners?
Yes. Arduino is considered one of the best robotics platforms for beginners because of its affordability, extensive documentation, and large community.
Can Arduino robots use artificial intelligence?
Yes. While Arduino itself has limited processing power, it can communicate with computers, cloud services, or AI modules to perform intelligent tasks.
Which sensor should beginners buy first?
An ultrasonic distance sensor is an excellent first choice because it is inexpensive, easy to use, and supports many robotics projects.
How much does a beginner robot cost?
A basic Arduino robot can typically be built for $40–$100 USD, depending on the quality of components and optional accessories.
Can Arduino robots operate wirelessly?
Yes. They can communicate using Bluetooth, Wi-Fi, radio frequency (RF), or other wireless modules.
What is the most common robotics project for beginners?
Obstacle-avoidance robots and line-following robots are among the most popular beginner projects because they teach sensor integration, motor control, and decision-making.
Conclusion 🎯
Arduino robotics provides an accessible yet powerful platform for learning engineering principles and creating real-world robotic systems. By combining electronics, programming, mechanics, and control theory, engineers and students can develop everything from simple educational robots to sophisticated autonomous machines.
The key to success lies in following a structured engineering process: understanding the theory, selecting suitable components, building a reliable mechanical design, writing modular software, and continuously testing and refining the system. As your experience grows, you can expand your projects with advanced sensors, wireless communication, computer vision, machine learning, and Internet of Things (IoT) capabilities.
Whether your goal is academic learning, professional development, rapid prototyping, or personal innovation, mastering Arduino robotics builds a strong foundation for future work in automation, embedded systems, industrial robotics, and intelligent engineering solutions. With creativity, persistence, and hands-on practice, today’s simple Arduino robot can become tomorrow’s advanced autonomous system.