Beginning Robotics with Raspberry Pi and Arduino: Using Python and OpenCV
Introduction 🤖🚀
Robotics brings together mechanical engineering, electronics, programming, sensing, control, and artificial intelligence. Fortunately, you no longer need an expensive laboratory to start experimenting. A small robot built around a Raspberry Pi, Arduino, camera, motors, and sensors can become a powerful learning platform.
The Raspberry Pi is well suited to higher-level computing tasks such as Python programs, image processing, networking, and computer vision. Arduino, meanwhile, is particularly useful for straightforward, predictable control of sensors and actuators. Combining the two creates a practical architecture in which each controller performs the type of work it handles best.


OpenCV adds another important capability: machine vision 👁️. Instead of relying exclusively on switches or distance sensors, a robot can inspect camera images and react to colors, shapes, edges, objects, or paths.
This article explains the engineering principles behind such a system from beginner to advanced level. The goal is not to reproduce a particular project or book, but to develop an original understanding of how Raspberry Pi, Arduino, Python, and OpenCV can work together in robotics.
A Raspberry Pi/Arduino architecture is commonly used to divide high-level processing from low-level hardware control.
Background Theory ⚙️
Robotics as a Multi-Layer Engineering System
A robot is more than a collection of motors and code. A useful way to understand it is as a feedback system:
Environment → Sensors → Processing → Decision → Actuators → Movement → Environment
This cycle repeats continuously.
A camera may provide visual information, an ultrasonic sensor may provide distance information, and wheel encoders may provide movement information. The controller interprets these inputs and determines what the robot should do next.
For example:
👁️ Camera sees an object → 🧠 Raspberry Pi processes image → 📡 command sent to Arduino → ⚡ Arduino controls motors → 🤖 robot changes direction.
Why Use Two Controllers?
A Raspberry Pi is essentially a small Linux computer. It can run Python applications, manage cameras, process images, communicate over networks, and perform computationally demanding operations.
Arduino is designed around microcontroller-style operation. It is excellent for reading sensors, generating control signals, and handling simple motor-control tasks with predictable timing.
This division produces a useful engineering concept:
Raspberry Pi = high-level intelligence 🧠
Arduino = real-time hardware interface ⚙️
A practical robotics system can therefore distribute responsibilities instead of forcing one board to perform everything.
Computer Vision Fundamentals
Computer vision converts visual information into data that software can interpret.
A typical pipeline looks like:
Camera → Image → Preprocessing → Feature Detection → Interpretation → Robot Decision
OpenCV provides tools for many of these operations, including image filtering, color processing, contours, geometric operations, and other computer-vision techniques.
Good lighting is especially important because changes in illumination can significantly affect visual processing. Raspberry Pi’s robotics guidance also emphasizes controlled, neutral lighting when experimenting with computer vision.
Definition 📘
What Is Raspberry Pi Robotics?
Raspberry Pi robotics is the use of a Raspberry Pi single-board computer as part of a robotic system for processing information, communicating with hardware, running software, and making high-level decisions.
It can act as the robot’s computational center.
What Is Arduino Robotics?
Arduino robotics involves using an Arduino microcontroller to interact with physical components such as motors, switches, sensors, servos, LEDs, and encoders.
It is particularly useful where simple and repeatable hardware control is required.
What Is OpenCV Robotics?
OpenCV robotics refers to applying computer-vision techniques from OpenCV to robotic perception and decision-making.
Instead of simply asking:
“What does the distance sensor say?”
the robot can ask:
“What does the camera see?”
That difference opens the door to line following, color tracking, object detection, visual navigation, gesture recognition, and many other experiments.
Step-by-Step Robotics Workflow 🔧
Step 1: Define the Robot’s Mission
Start with one clear objective.
Good beginner projects include:
- Line-following robot
- Color-following robot
- Obstacle-avoidance robot
- Remote-controlled camera robot
- Object-tracking robot
- Autonomous navigation prototype
Avoid attempting autonomous driving, facial recognition, mapping, and voice control simultaneously.
A focused objective makes debugging dramatically easier.
Step 2: Select the Hardware
A typical educational platform may include:
| Component | Main Function |
|---|---|
| Raspberry Pi | High-level processing |
| Arduino | Hardware and actuator control |
| Camera | Visual perception |
| Motor driver | Motor power/control interface |
| DC motors | Movement |
| Ultrasonic sensor | Distance measurement |
| IR sensors | Line/object detection |
| Battery | Electrical power |
| Chassis | Mechanical structure |
| Wheels | Locomotion |
The exact components can vary depending on the robot’s size and objectives.
Step 3: Build the Mechanical Platform
Before writing sophisticated software, make sure the robot can physically move.
Check:
- Wheel alignment
- Motor mounting
- Chassis rigidity
- Battery placement
- Cable routing
- Camera position
- Center of gravity
⚠️ A poorly balanced robot can make a perfectly written control algorithm appear defective.
Step 4: Connect the Arduino
The Arduino can read low-level sensors and control motor-driver inputs.
A basic control architecture is:
Arduino → Motor Driver → Motors
The motor driver is important because the Arduino should not directly power typical DC motors.
Step 5: Connect the Raspberry Pi
The Raspberry Pi can communicate with Arduino through interfaces such as USB serial communication.
The conceptual flow becomes:
Python → Communication Interface → Arduino → Motor Driver → Motors
The Pi can therefore send commands such as:
- Forward
- Reverse
- Turn left
- Turn right
- Stop
- Adjust speed
Step 6: Add the Camera 📷
Mount the camera so that it provides a stable view of the robot’s operating environment.


Camera placement affects everything from field of view to object size in the image. A camera mounted too low may see mostly the floor, while a camera mounted too high may make line detection difficult.
Step 7: Capture Images with Python
Python can receive frames from a camera and pass them to OpenCV.
Conceptually:
Start camera
      ↓
Capture frame
      ↓
Convert/process image
      ↓
Find visual feature
      ↓
Make decision
      ↓
Send command
      ↓
Repeat
The important engineering idea is the continuous perception-action loop.
Step 8: Process the Image
OpenCV can transform a raw image into something easier to analyze.
Common operations include:
- Resizing
- Cropping
- Noise reduction
- Color conversion
- Thresholding
- Edge detection
- Contour extraction
- Shape analysis
For example, a color-following robot does not necessarily need to understand the entire scene. It may only need to identify a particular color region and estimate whether that region is left, center, or right.
Step 9: Convert Vision into a Decision
Suppose OpenCV identifies the target near the right side of the image.
The Python program could interpret that observation as:
Target right → turn right
If the target is centered:
Target center → move forward
If no target is visible:
Target missing → stop or search
This transforms computer vision into robot behavior.
Step 10: Send the Command to Arduino
Python sends a simple command to Arduino.
For example:
F = Forward
B = Backward
L = Left
R = Right
S = Stop
Arduino receives the command and translates it into motor-control actions.
This simple communication model is excellent for learning because the responsibilities remain easy to understand.
Raspberry Pi vs Arduino: Engineering Comparison 🔍
| Feature | Raspberry Pi | Arduino |
|---|---|---|
| Main role | Computing | Microcontroller control |
| Operating system | Linux-based OS | Firmware |
| Python | Excellent | Usually not the primary choice |
| Computer vision | Strong | Very limited for conventional setups |
| GPIO control | Yes | Yes |
| Motor control | Possible | Excellent for simple control |
| Networking | Strong | Depends on hardware |
| Camera processing | Strong | Limited |
| Real-time simplicity | Moderate | Strong |
| Best use | Intelligence/perception | Sensors/actuators |
When Raspberry Pi Is Better
Choose Raspberry Pi when your robot needs:
- Computer vision
- Python applications
- Wi-Fi networking
- Web interfaces
- Image storage
- More advanced algorithms
- Higher-level decision making
When Arduino Is Better
Choose Arduino when your task mainly involves:
- Reading switches
- Reading simple sensors
- Controlling motors
- Controlling servos
- Generating basic timing signals
- Handling predictable hardware operations
Why Combining Them Can Be Better
The combination avoids forcing one platform to do everything.
A Raspberry Pi can concentrate on thinking, while Arduino concentrates on physical execution.
System Diagrams and Architecture 🧩
Basic Dual-Controller Architecture


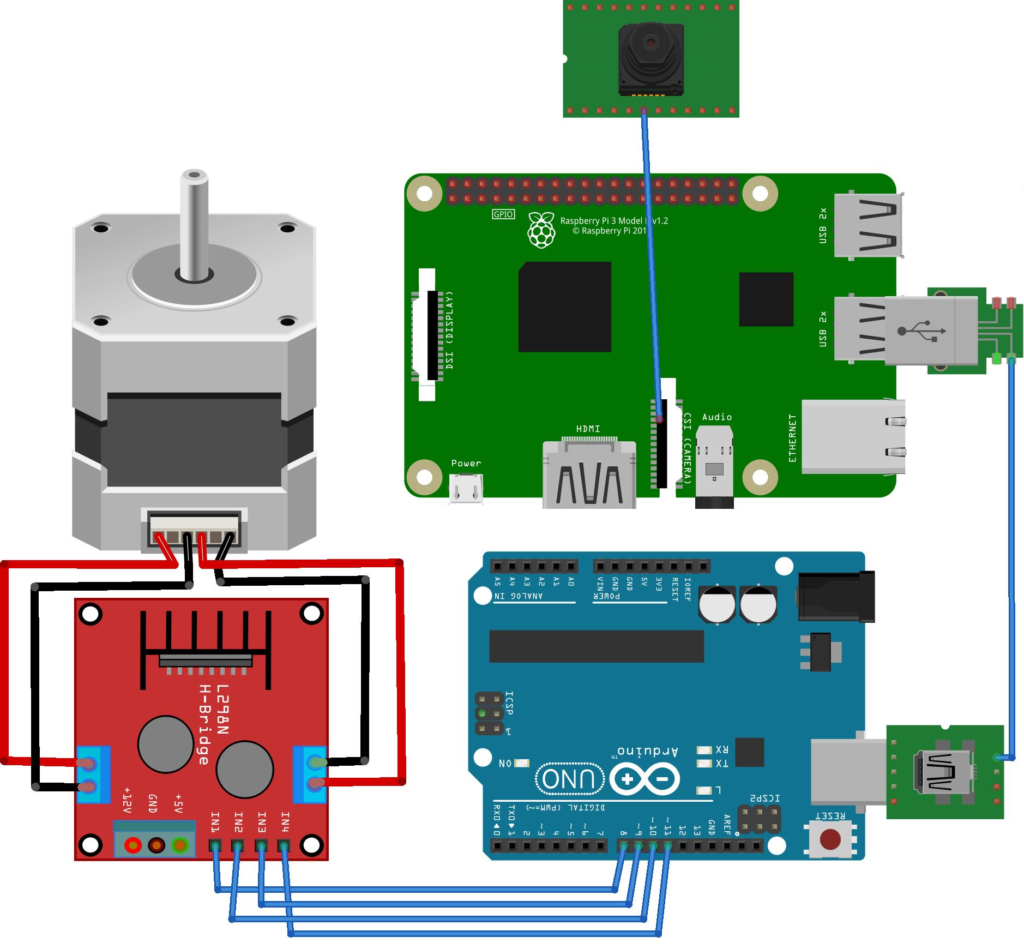
A useful conceptual architecture is:
             ┌───────────────┐
             │    Camera     │
             └───────┬───────┘
                     ↓
             ┌───────────────┐
             │ Raspberry Pi  │
             │ Python/OpenCV │
             └───────┬───────┘
                     │
              Command/Data
                     │
                     ↓
             ┌───────────────┐
             │    Arduino    │
             └───────┬───────┘
                     ↓
             ┌───────────────┐
             │ Motor Driver  │
             └───────┬───────┘
                     ↓
                DC Motors
                     ↓
                  Robot
Sensor-Fusion Architecture
More advanced systems can add additional information:
Camera ────────┐
               ↓
Distance ─────→ Raspberry Pi → Decision → Arduino → Motors
Sensor ────────┘
                    ↑
               Encoders/IMU
The robot can then combine visual information with physical measurements.
Control Layers
| Layer | Responsibility |
|---|---|
| Perception | Understand sensor/camera information |
| Decision | Select desired action |
| Communication | Transfer commands |
| Control | Execute motor behavior |
| Mechanical | Convert motor output into movement |
This layered approach is common in robotics because it makes complex systems easier to design and troubleshoot.
Practical Examples 🛠️
Example 1: Color-Following Robot
Imagine a robot searching for a red object.
The camera continuously captures images. Python and OpenCV identify the red region and determine its approximate position.
If the object appears on the left, the robot turns left.
If it appears in the center, the robot moves forward.
If it disappears, the robot stops or rotates slowly while searching.
Example 2: Line-Following Robot
A camera observes a dark line on a bright surface.
OpenCV processes the image and estimates where the line is located.
The robot then adjusts its movement to remain aligned with the path.
This demonstrates an important robotics principle:
Perception → Error detection → Corrective action
Example 3: Obstacle-Aware Robot
The camera detects the environment while an ultrasonic sensor provides additional distance information.
If the camera suggests a clear route but the distance sensor detects a nearby obstacle, the robot can prioritize the safety-related sensor input.
This demonstrates sensor fusion rather than dependence on one sensor.
Real-World Applications 🌍
Educational Robotics
Universities and technical schools can use Raspberry Pi and Arduino robots to teach:
- Embedded systems
- Programming
- Electronics
- Control systems
- Computer vision
- Mechatronics
Industrial Prototyping
Low-cost robotic platforms can be useful for validating ideas before investing in larger industrial hardware.
A prototype can test:
- Visual inspection concepts
- Navigation logic
- Sensor arrangements
- Human-machine interaction
Autonomous Mobile Robots
Computer vision can support mobile robots used for navigation, inspection, research, and experimental automation.
Smart Surveillance
A mobile platform equipped with a camera can monitor a controlled environment and respond to selected visual events.
Research and Student Projects
The architecture is particularly valuable for projects where students need to demonstrate an entire engineering pipeline rather than only a software algorithm.
Common Mistakes ⚠️
Using the Raspberry Pi to Drive Motors Directly
A GPIO pin is a control signal, not a substitute for a suitable motor driver and power system.
Ignoring Power Design
Motors can introduce electrical noise and sudden current demand. Poor power architecture may cause random resets or communication failures.
Starting with Complex AI
Beginners often jump directly into neural networks.
A better progression is:
Sensors → Rules → OpenCV → Classical vision → Machine learning → Advanced AI
Poor Camera Placement
A camera that vibrates or points at the wrong angle can make vision algorithms unreliable.
Testing Everything at Once
Test each subsystem independently.
First test the motor.
Then the sensor.
Then the camera.
Then OpenCV.
Then communication.
Finally combine everything.
Challenges & Solutions 💡
| Challenge | Practical Solution |
|---|---|
| Raspberry Pi resets | Improve power supply and wiring |
| Motors behave unpredictably | Check driver and motor power |
| Camera detection changes | Improve lighting and preprocessing |
| Robot oscillates | Tune movement logic |
| Serial communication fails | Simplify the protocol and test separately |
| Robot moves too quickly | Reduce speed during testing |
| Vision processing is slow | Lower image resolution or process fewer frames |
| Sensor readings are noisy | Apply filtering and validation |
Lighting Is a Major Challenge
Computer vision depends heavily on image quality.
Shadows, reflections, low light, and changing illumination can cause an object to appear different from one frame to another. Controlled test environments are therefore extremely useful during early development.
Processing Speed
A Raspberry Pi may need to perform several tasks simultaneously.
Reducing unnecessary image resolution, limiting processing to a region of interest, and avoiding excessive image operations can improve responsiveness.
Case Study: Building a Vision-Guided Robot 🚗👁️
Consider a student engineering team developing a small autonomous robot.
The first prototype uses:
- Raspberry Pi
- Arduino
- Camera
- Two DC motors
- Motor driver
- Distance sensor
- Battery
- Wheeled chassis
The team initially tries to make the Raspberry Pi handle everything. The result is difficult to debug because camera processing, motor commands, and sensor operations are tightly connected.
The engineers redesign the architecture.
The Raspberry Pi becomes responsible for:
Camera → OpenCV → Decision
Arduino becomes responsible for:
Command → Motor control → Movement
The distance sensor is also connected to the low-level controller.
Now the system has clearer boundaries.
When the robot sees an object, Raspberry Pi determines what the object means. Arduino executes the movement command.
This type of architecture has been demonstrated in practical educational and research robot projects using Raspberry Pi, Arduino, cameras, OpenCV, and additional sensors.
The biggest engineering improvement is not necessarily a more complicated algorithm. It is better system organization.
Essential Tips for Beginners and Professionals ⭐
For Beginners
- Start with a simple two-wheel robot.
- Learn basic Python first.
- Learn Arduino digital and analog I/O.
- Test motors independently.
- Learn basic OpenCV image operations.
- Use a controlled environment.
- Add one sensor at a time.
- Keep commands simple.
- Document every wiring change.
- Build incrementally.
For Advanced Learners
Once the basic system works, explore:
- pis-based motion control
- Wheel encoders
- IMUs
- Sensor fusion
- Object detection
- Machine learning
- SLAM
- ROS 2
- Path planning
- Autonomous navigation
- Edge AI
- Real-time optimization
A Raspberry Pi/OpenCV robot can become a stepping stone toward much more advanced robotics systems.
FAQs ❓
1. Can a Raspberry Pi control a robot without Arduino?
Yes. A Raspberry Pi can control many robotic systems directly through suitable interfaces and motor-control hardware. However, Arduino can simplify low-level sensor and actuator management.
2. Why use Python for robotics?
Python is relatively accessible and has a large ecosystem. It is particularly useful for high-level robotics logic, computer vision, networking, and rapid prototyping.
3. What does OpenCV do in a robot?
OpenCV processes images and extracts useful visual information. A robot can use this information for tasks such as color tracking, line detection, shape recognition, and visual navigation.
4. Is Arduino better than Raspberry Pi?
Neither is universally better. Arduino is excellent for straightforward microcontroller tasks, while Raspberry Pi is stronger for operating-system-level computing, Python applications, networking, and computer vision.
5. Can a Raspberry Pi robot recognize objects?
Yes. Basic computer vision can identify colors, shapes, and visual patterns. More sophisticated object recognition can use machine-learning models in addition to OpenCV.
6. Does robotics require advanced mathematics?
Advanced robotics eventually involves mathematics, especially for kinematics, dynamics, control, localization, and estimation. However, beginners can build useful robots without starting with advanced mathematical theory.
7. What is the best first computer-vision project?
A simple color-tracking or line-following robot is an excellent starting point because the visual objective is easy to understand and test.
8. Can Raspberry Pi and Arduino communicate?
Yes. They can communicate through suitable interfaces such as serial connections. The exact protocol should be designed around the application’s reliability and timing requirements.
Conclusion 🎯
Beginning robotics with Raspberry Pi, Arduino, Python, and OpenCV provides a powerful path from basic electronics to modern autonomous systems.
The key is understanding that robotics is a complete engineering loop:
Sense → Process → Decide → Act → Measure → Repeat 🔄
Raspberry Pi provides a capable platform for Python, networking, camera processing, and higher-level intelligence. Arduino provides a practical interface for sensors and actuators. OpenCV bridges the physical world and software by converting camera images into information that a robot can use.
The most successful projects do not begin with maximum complexity. They begin with a small, measurable objective, establish reliable hardware, test each subsystem, and gradually introduce more sophisticated perception and control.
Once a simple robot can reliably sense its environment and respond to it, the possibilities become much larger—from educational mobile robots to computer-vision prototypes, autonomous navigation experiments, inspection systems, and advanced AI-enabled machines. 🤖⚡
The real lesson is therefore not simply how to build one robot. It is how to think like a robotics engineer: divide the problem, test every layer, measure performance, and continuously improve the system.