Learn Robotics Programming 2nd Edition with Raspberry Pi and Python: Build AI-Enabled Autonomous Robots
Introduction
🤖 Robotics programming brings together mechanical engineering, electronics, computer science, control systems, and artificial intelligence. One of the most accessible ways to explore these disciplines is to combine a Raspberry Pi single-board computer with Python.
A Raspberry Pi can act as the robot’s computational brain. Python programs can read sensors, control motors, process camera images, communicate over Wi-Fi, and make decisions based on environmental information. This makes the platform useful for both beginners learning programming and advanced students exploring autonomous navigation, computer vision, and AI.
A typical educational robot may contain:
- 🧠 Raspberry Pi 4 or Raspberry Pi 5
- ⚙️ DC motors and motor driver
- 📏 Ultrasonic or time-of-flight distance sensors
- 📷 Raspberry Pi Camera or USB camera
- 🔋 Battery and voltage regulation
- 🛞 Differential-drive chassis
- 📡 Wi-Fi/Bluetooth communication
- 🐍 Python software
- 👁️ OpenCV or an AI vision model
- 🧭 Navigation and control algorithms
The important idea is that autonomy is not a single technology. It is a pipeline:
Sense → Understand → Decide → Act → Measure → Correct
This architecture is fundamental to autonomous mobile robotics. Raspberry Pi projects have demonstrated everything from obstacle avoidance to computer vision and autonomous navigation.


Background Theory
How an Autonomous Robot Thinks
An autonomous robot continuously interacts with its environment.
Consider a simple mobile robot approaching an obstacle:
Sensor → Raspberry Pi → Python algorithm → Motor driver → Motors
The ultrasonic sensor might report:
Distance = 18 cm
The Python control program compares this value with a safety threshold:
18 cm < 30 cm → obstacle detected
The robot then changes its behavior:
Stop → Reverse → Turn → Continue
More sophisticated robots replace simple thresholds with algorithms involving mapping, localization, path planning, and machine learning.
Robotics Control Loop
The fundamental control loop can be represented as:
[e(t)=r(t)-y(t)]
where:
- (r(t)) = desired state
- (y(t)) = measured state
- (e(t)) = control error
For example, suppose a line-following robot should remain centered on a line. If the desired position is 0 and the detected position is +20 pixels:
[e=0-20=-20]
The controller can use this error to adjust the left and right motor speeds.
For advanced projects, PID control is often expressed as:
u(t)=K_Pe(t)+K_I\int e(t)dt+K_D\frac{de(t)}{dt}
This provides proportional, integral, and derivative correction.
Definition
What Is Robotics Programming?
Robotics programming is the process of developing software that allows a robot to sense its environment, control hardware, process information, and perform tasks.
With Raspberry Pi and Python, this can include:
- GPIO control
- Motor control
- Sensor acquisition
- Computer vision
- Object detection
- Path planning
- Localization
- Wireless communication
- Data logging
- Artificial intelligence
What Is an AI-Enabled Autonomous Robot?
An AI-enabled autonomous robot uses algorithms capable of interpreting sensor information and selecting actions without requiring continuous human commands.
For example:
Camera → Object Detection → Target Location → Navigation Decision → Motor Command
An advanced robot could recognize a person, identify a particular object, estimate its location, and then navigate toward or away from it.
Python is particularly useful for robotics education because robotics algorithms—including navigation and path-planning examples—are widely implemented in Python.
Step-by-Step: Build a Raspberry Pi Python Robot


Step 1: Select the Robot Architecture
For a first project, a two-wheel differential-drive robot is a practical choice.
It normally has:
- Two independently controlled motors
- Two drive wheels
- One caster wheel
- Motor driver
- Raspberry Pi
- Battery
The robot can turn by changing the relative speed of its wheels.
For example:
| Left Motor | Right Motor | Result |
|---|---|---|
| Forward | Forward | Move forward |
| Reverse | Reverse | Move backward |
| Stop | Forward | Turn left |
| Forward | Stop | Turn right |
| Forward | Reverse | Pivot |
Step 2: Add the Motor Driver
⚠️ Never connect a DC motor directly to a Raspberry Pi GPIO pin.
GPIO pins are intended for control signals, while motors require substantially more current and can generate electrical noise.
A motor driver acts as the interface:
Raspberry Pi GPIO → Motor Driver → Motor
The driver handles the higher-current motor supply while the Raspberry Pi supplies the control signals.
Step 3: Install Python Software
On Raspberry Pi OS, Python provides the main programming environment.
A simple architecture might use:
Python Application
       ↓
Robot Controller
       ↓
GPIO / I²C / SPI
       ↓
Sensors + Motor Driver
For modern Raspberry Pi projects, libraries such as gpiozero can simplify hardware control.
Step 4: Create Basic Motor Functions
Instead of writing low-level motor instructions throughout the application, create reusable functions:
def forward():
    left_motor.forward()
    right_motor.forward()

def backward():
    left_motor.backward()
    right_motor.backward()

def stop():
    left_motor.stop()
    right_motor.stop()

def turn_left():
    left_motor.stop()
    right_motor.forward()
This creates a clean software layer between the AI logic and physical hardware.
Step 5: Add Distance Sensing
An ultrasonic sensor can estimate the distance to an obstacle.
Conceptually:
[d=\frac{vt}{2}]
where:
- (d) = distance
- (v) = speed of sound
- (t) = measured round-trip time
The division by 2 is necessary because the ultrasonic pulse travels toward the obstacle and returns.
A basic decision algorithm might be:
if distance < 30:
    stop()
    backward()
    turn_left()
else:
    forward()
This is already an autonomous behavior.
Step 6: Add a Camera
📷 The next major improvement is visual perception.
The camera provides images that Python can process using computer-vision tools such as OpenCV.
The pipeline becomes:
Camera
   ↓
Image
   ↓
Pre-processing
   ↓
Object Detection
   ↓
Object Position
   ↓
Decision
   ↓
Motor Control
For example, if the robot detects an object in the left side of its camera frame, it can adjust its direction.
Step 7: Add AI
Traditional computer vision might detect a specific color or shape.
AI-based vision can instead recognize categories of objects.
For example:
Camera → Neural Network → “Person” detected → Navigation behavior
This changes the robot from a simple sensor-controlled machine into a more intelligent robotic system.
Step 8: Implement a Safety Layer
A professional design should separate AI decisions from safety-critical motor control.
For example:
AI Decision
     ↓
Navigation Controller
     ↓
Safety Controller
     ↓
Motor Driver
If the AI says:
“Move forward”
but an ultrasonic sensor reports:
“Obstacle at 10 cm”
the safety controller should override the movement command.
🚨 Safety should have higher priority than autonomy.
Comparison
Raspberry Pi vs Microcontroller Robotics
| Feature | Raspberry Pi | Microcontroller |
|---|---|---|
| Operating system | Yes | Usually no |
| Python support | Excellent | Depends on platform |
| Computer vision | Excellent | Limited |
| AI models | Practical for selected models | More constrained |
| GPIO | Yes | Yes |
| Real-time control | Limited compared with MCU | Excellent |
| Networking | Built-in on many models | Depends |
| Processing power | High | Lower |
| Best use | AI, vision, high-level control | Precise low-level control |
A powerful architecture can combine both.
Raspberry Pi = high-level intelligence
Microcontroller = real-time hardware control
This division is common when precise motor timing must coexist with computationally intensive perception.
Diagrams and System Architecture


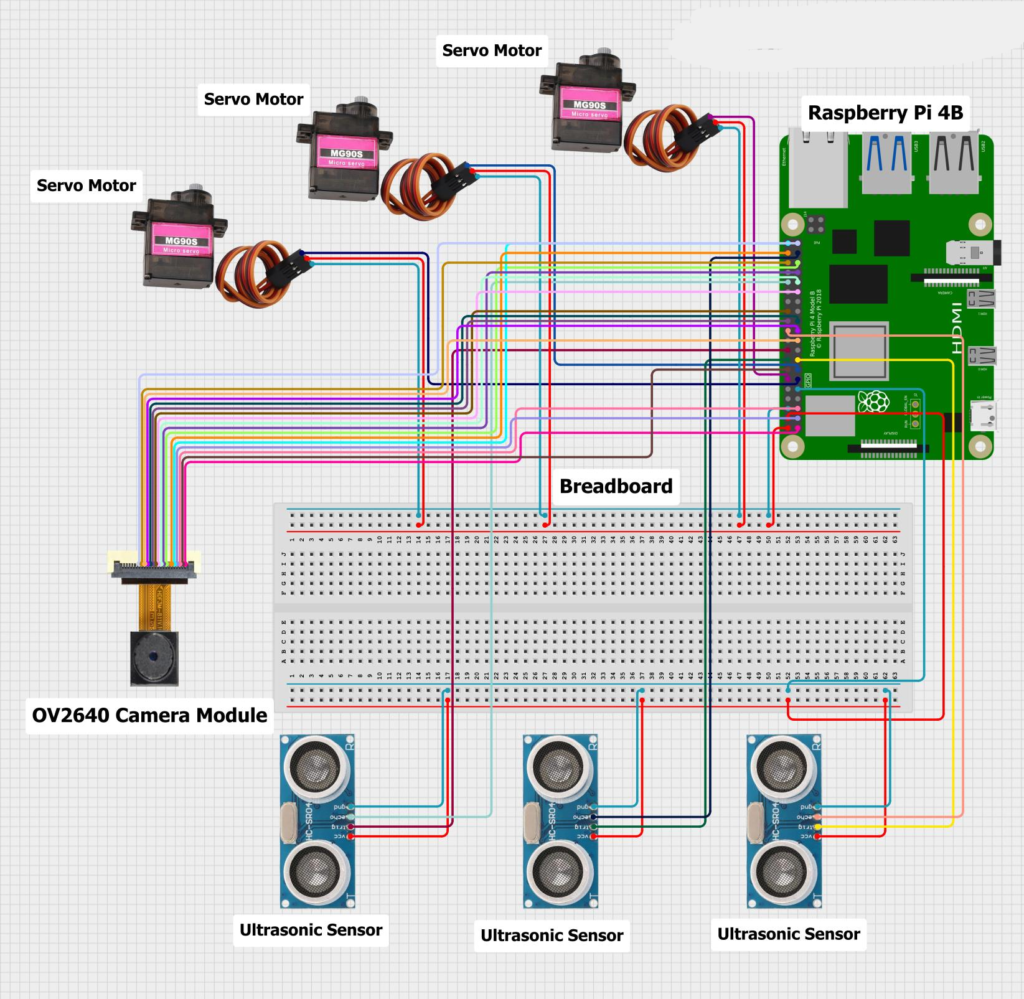


Basic Architecture
             ┌──────────────┐
             │    Camera    │
             └──────┬───────┘
                    ↓
┌──────────┐  ┌──────────────┐
│ Distance ├─→│ Raspberry Pi │
│ Sensors  │  │    Python    │
└──────────┘  └──────┬───────┘
                     ↓
              ┌─────────────┐
              │ Controller  │
              └──────┬──────┘
                     ↓
              ┌─────────────┐
              │Motor Driver │
              └──────┬──────┘
                     ↓
                ┌────────┐
                │ Motors │
                └────────┘
Software Architecture
┌─────────────────────────────┐
│       AI / Vision Layer     │
├─────────────────────────────┤
│     Decision-Making Layer   │
├─────────────────────────────┤
│     Navigation / Control    │
├─────────────────────────────┤
│       Hardware Drivers      │
├─────────────────────────────┤
│ Raspberry Pi / Electronics  │
└─────────────────────────────┘
Typical Hardware Selection
| Component | Beginner | Advanced |
|---|---|---|
| Computer | Raspberry Pi | Raspberry Pi 5 |
| Sensor | Ultrasonic | LiDAR + IMU |
| Camera | USB camera | CSI camera/depth camera |
| Navigation | Threshold logic | SLAM/Nav2 |
| Control | Basic speed | PID |
| AI | Color detection | Object detection |
| Communication | SSH | ROS 2/networked robotics |
Examples
Example 1: Obstacle Avoidance
The robot continuously measures distance.
while True:
    distance = read_distance()

    if distance < 25:
        stop()
        turn_left()
    else:
        forward()
This approach is simple but useful for understanding autonomous decision-making.
Example 2: Line Following
A line-following robot can use infrared sensors.
Suppose:
Left sensor  = 0
Right sensor = 1
The robot might interpret this as a line appearing on one side and adjust its motor speeds.
A more advanced system calculates a continuous error and applies PID control.
Example 3: AI Object Following
Imagine the camera detects a target at image coordinate (x).
If:
[x < x_{center}-\Delta]
the robot turns left.
If:
[x > x_{center}+\Delta]
it turns right.
If:
[|x-x_{center}|<\Delta]
it moves forward.
The robot can therefore maintain the target near the center of its camera frame.
Real-World Applications
Education and Research
Raspberry Pi robots are excellent platforms for teaching:
- Embedded programming
- Robotics
- Artificial intelligence
- Computer vision
- Control theory
- Sensor fusion
- Autonomous navigation
Research platforms have also demonstrated Raspberry Pi-based path planning using sensors such as ultrasonic sensors, wheel encoders, and compasses.
Smart Home Robotics
🏠 Autonomous robots can perform tasks such as:
- Indoor monitoring
- Object transportation
- Environmental sensing
- Navigation between rooms
- Remote inspection
Industrial Prototyping
Engineers can use small autonomous robots to prototype concepts before transferring them to larger platforms.
Potential applications include:
- Warehouse navigation
- Inspection
- Inventory movement
- Autonomous delivery
- Machine monitoring
Common Mistakes
Powering Motors Directly from GPIO
❌ This can damage hardware.
Use a suitable motor driver and appropriate power architecture.
Ignoring Voltage Levels
Different sensors and controllers can use different voltage levels.
Always verify:
VCC + Logic Level + Ground + Signal Compatibility
Using Poor Batteries
A robot may work perfectly on a bench but fail when motors accelerate.
Motors can produce significant current demand, causing voltage drops and Raspberry Pi resets.
Running Everything in One Python Loop
A large program such as:
Camera
+
AI
+
Sensor reading
+
Motor control
+
Web server
inside one blocking loop can become difficult to maintain.
Separate functions—or processes/nodes for advanced systems—make debugging easier.
Testing AI Before Basic Motion
🚫 Do not begin with sophisticated AI.
First verify:
Motor → Sensor → Controller → Camera → AI
one stage at a time.
Challenges & Solutions
| Challenge | Cause | Solution |
|---|---|---|
| Robot resets | Power instability | Separate/regulate motor and logic power |
| Erratic movement | Poor motor calibration | Calibrate each motor |
| Bad vision | Lighting variation | Improve lighting and preprocessing |
| Slow AI | Excessive model size | Reduce resolution/model complexity |
| Sensor noise | Electrical/environmental interference | Filtering and shielding |
| Navigation errors | Wheel slip | Encoders + sensor fusion |
| Oscillation | Poor control gains | Tune PID parameters |
| Overheating | High computational load | Improve cooling and workload |
Case Study: Building an Autonomous Indoor Rover
Consider a university engineering team developing a small indoor inspection robot.
Phase 1 — Mobility
The team first builds a differential-drive chassis and verifies forward, reverse, left, and right movement.
Phase 2 — Obstacle Detection
An ultrasonic sensor is added.
The robot stops when:
[d<30\text{ cm}]
Phase 3 — Camera
A camera is installed to provide visual information.
The software captures frames and performs image processing.
Phase 4 — AI
An object-detection model identifies selected objects.
The system now has:
Vision
   ↓
Object Recognition
   ↓
Position Estimation
   ↓
Navigation Decision
   ↓
Motor Command
Phase 5 — Safety
A separate safety routine continuously monitors obstacle distance.
Even if the AI produces an incorrect movement command, the safety layer can stop the robot.
This staged development approach is much more reliable than attempting to construct the entire autonomous system simultaneously.
Essential Tips
Start Simple 🛠️
Build a robot that can simply:
Move → Stop → Turn
before adding AI.
Calibrate Everything
Real motors are rarely identical.
If Motor A produces 100 RPM and Motor B produces 92 RPM, a supposedly straight command may produce a curved trajectory.
Log Sensor Data
Store:
Timestamp
Distance
Motor Speed
Camera Result
Robot State
Data logging makes debugging much easier.
Use Modular Python
Organize the application into modules such as:
robot/
├── motors.py
├── sensors.py
├── camera.py
├── navigation.py
├── ai.py
└── main.py
Think in Layers
A strong robotics architecture separates:
Hardware → Drivers → Control → Navigation → AI
This makes future upgrades much easier.
Learn ROS 2 for Advanced Projects
When a robot grows beyond a simple educational project, ROS 2 can provide a structured framework for communication between different robotics components.
You can eventually move from:
One Python program
to:
Multiple robotics nodes communicating with each other.
That transition is particularly valuable for students preparing for professional robotics engineering.
FAQs
Can beginners learn robotics programming with Raspberry Pi?
Yes. Raspberry Pi and Python provide an accessible starting point because you can begin with simple GPIO and motor commands and progressively add sensors, cameras, control algorithms, and AI.
Do I need advanced Python knowledge?
No. Basic Python is enough to begin. You should understand variables, functions, conditions, loops, classes, and modules. Advanced robotics projects will gradually introduce more sophisticated programming concepts.
Can Raspberry Pi run artificial intelligence?
Yes, depending on the model, AI workload, optimization, and model size. Lightweight computer-vision and machine-learning applications are practical, while larger models may require specialized accelerators or more powerful hardware.
Can a Raspberry Pi robot navigate without a camera?
Yes. A robot can use ultrasonic sensors, infrared sensors, wheel encoders, IMUs, LiDAR, or combinations of these technologies. A camera is useful but not mandatory.
What is the difference between autonomous and remote-controlled robots?
A remote-controlled robot receives continuous commands from a human. An autonomous robot uses sensors and software to determine its own actions according to programmed objectives.
Is Python fast enough for robotics?
Python is excellent for high-level robotics logic, AI integration, computer vision, experimentation, and education. For extremely time-critical low-level control, engineers may combine Python with C/C++, a microcontroller, or dedicated hardware.
Can I add AI later?
Absolutely. In fact, this is often the best approach. First build reliable motion and sensing, then add computer vision and AI.
What should I learn after Raspberry Pi robotics?
A useful progression is:
Python → Electronics → Sensors → Motor Control → Computer Vision → PID → Localization → Path Planning → ROS 2 → AI/ML
Conclusion
🚀 Raspberry Pi + Python is an excellent gateway into modern robotics programming.
The real engineering value comes from combining multiple disciplines. A robot is not simply a Raspberry Pi attached to motors. It is an integrated system containing mechanics, electronics, sensing, software, control theory, perception, decision-making, and safety.
A beginner can start with a two-wheel robot and a few lines of Python. From there, the same architecture can evolve into a sophisticated autonomous platform using cameras, AI models, LiDAR, encoders, PID control, mapping, localization, and ROS 2.
The most effective development strategy is incremental:
Build → Measure → Control → Add Sensors → Add Vision → Add AI → Test → Improve
That progression turns a simple robot car into a practical engineering laboratory—and gives students and professionals hands-on experience with the same fundamental concepts used in autonomous robotics research and industry.